Gamedev in Lisp. Part 1: ECS and Metalinguistic Abstraction
In this series of tutorials, we will delve into creating simple 2D games in Common Lisp. The result of the first part will be a development environment setup and a basic simulation displaying a 2D scene with a large number of physical objects. It is assumed that the reader is familiar with some high-level programming language, has a general idea of how graphics are displayed on a computer screen, and is interested in expanding their horizons.
Common Lisp is a programming language with a rich history of providing effective tools for developing complex, interactive applications such as video games. This series of tutorials aims to illustrate a range of CL capabilities that fit seamlessly into the context of game development. A short overview of these capabilities and the unique features of Common Lisp is provided in Yukari Hafner’s article “Using a Highly Dynamic Language for Development”.
Many features first introduced in Lisp, such as the if/then/else conditional construct, functions as first class objects, garbage collection, and others have long since made their way into mainstream programming languages. However, one unique feature that we’ll look at today is metalinguistic abstraction.
Metalinguistic abstraction
To grok this concept, let’s turn to the well-known fundamental textbook “Structure and Interpretation of Computer Programs”:
However, as we confront increasingly complex problems, we will find that Lisp, or indeed any fixed programming language, is not sufficient for our needs. We must constantly turn to new languages in order to express our ideas more effectively. Establishing new languages is a powerful strategy for controlling complexity in engineering design; we can often enhance our ability to deal with a complex problem by adopting a new language that enables us to describe (and hence to think about) the problem in a different way, using primitives, means of combination, and means of abstraction that are particularly well suited to the problem at hand.
Metalinguistic abstraction — establishing new languages — plays an important role in all branches of engineering design.
To appreciate this point is to change our images of ourselves as programmers. We come to see ourselves as designers of languages, rather than only users of languages designed by others.
So, an important mechanism provided by virtually any Lisp dialect, including of course one of the most powerful of them, Common Lisp, is the ability to create your own language constructs within the language itself. This concept is also known as DSL (Domain Specific Languages), but only Lisp dialects have it incredibly tightly integrated into their core. In most of them, the mechanism of metalinguistic abstraction is built around so-called macros, special functions defined by the programmer, which are called at compile time and return small fragments of program code for the compiler to substitute wherever they occur. The distinctive feature of Lisps is that the code is essentially a regular nested list, which makes it easy and efficient to generate and process program code fragments.
There are numerous of different ways to creatively use and abuse this feature. I’d like to introduce the cl-fast-ecs macro library I’ve created, which provides a mini-language for describing game objects and their processing rules using the Entity-Component-System pattern often used in game development.
Entity Component System
ECS is a rather straightforward pattern for organizing data storage and processing in game applications that achieves two important conceptual goals at once:
- Flexibility in defining and modifying the structure of game objects.
- Performance gains through efficient utilization of CPU caches.
Flexibility, interactivity, and the ability to redefine program behavior on the fly are cornerstones of most Lisp-like languages. We will revisit this issue later, but for now let’s focus a bit more on the second goal, which is often presented as the main advantage of the ECS pattern. Let’s start from the beginning.
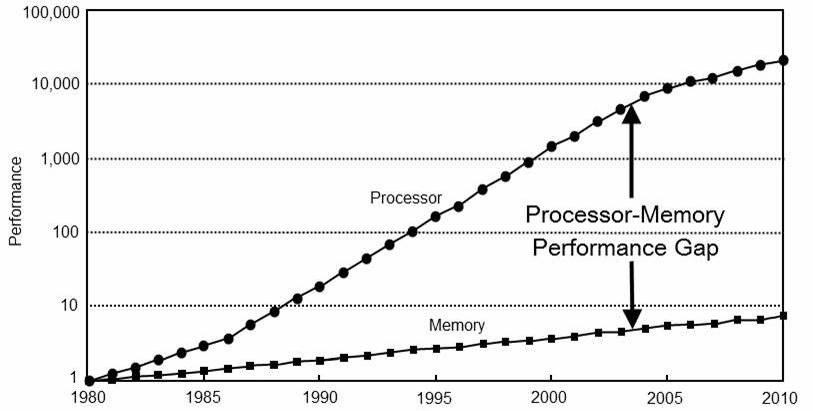
In the Von Neumann architecture currently used in most computing devices, there is a fundamental problem called the “Von Neumann bottleneck”. Its essence is that no matter how fast the CPU processes data, its processing speed is limited by memory performance. Moreover, the performance of the “CPU-memory” system is limited by the bandwidth of the bus through which these nodes exchange information, and this value cannot grow indefinitely or at least at the same rate as the CPU performance grows. The problem is vividly illustrated by the following graph:
 (source: Aras Pranckevičius. “Entity Component Systems & Data Oriented Design”)
The curve labeled “Processor” represents the number of memory requests the CPU can make per unit of time; the curve labeled “Memory” represents the number of requests RAM can process per unit of time (both values are normalized to the average values in 1980). Even superficially analyzing the graph, one can come to a disappointing conclusion — most of the time the CPU is idle waiting for data from memory, and over time the gap between CPU and memory performance is getting larger and larger.
Already in the early 1990s, with the release of the Intel 486, a common solution to this problem in consumer grade hardware was the cache located on the same chip as the processor. The cache is a small but extremely fast memory that stores the data requested by the processor earlier, thus reducing the duration of subsequent requests for the same data by retrieving them from the cache instead of the slower main memory. Toward the end of the nineties, the cache started to be divided into several levels (L1, L2, etc.), each subsequent level having a larger capacity, but also a higher latency, although still significantly lower than the latency of access to the main RAM. Typical memory interaction timings of desktop hardware as of 2020 are as follows:
- processor register: <1 ns
- L1 cache: 1 ns
- L2 cache: 3 ns
- L3 cache: 13 ns
- RAM: 100 ns
(source: dzone.com)
CPU cache helps a lot in optimizing sequential access to memory cells. Even when the processor requests for a single byte from RAM, an entire cache line is returned to it and stored in the cache. On modern x86 architectures, a cache line is 64 bytes (512 bits) long.
So, if we sequentially process elements of an array, for example, single precision floating point numbers (32 bit floats), the first access to an element not only retrieves the requested element but also (512 − 32) ∕ 32 = 15 subsequent elements. For the next 15 iterations of the loop, accessing the element will take 1 ns instead of 100 ns. Thus, thanks to the cache, our loop operates approximately 16 × 100 ∕ (100 + 15 × 1) ≈ 14 times faster regardless of the array’s length! This example illustrates how important it is from the performance point of view to process data in such a way that it remains “hot” in cache.
To understand how the ECS architectural pattern contributes to cache utilization, let’s examine its key parts:
- entity - a composite game object;
- component - data describing some logical facet of an object;
- system - code that processes objects of a specific structure.
Let’s first deal with entities and components with a concrete example:
 (source: Mick West. “Cowboy Programming. Evolve Your Hierarchy”)
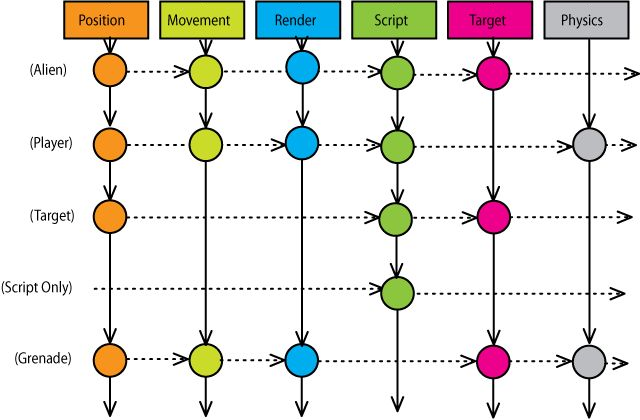
Horizontally, the components Position, Movement, Render and so on are represented by colored rectangles. Note that each of these components may contain several data fields, for example, Position and Movement will almost certainly contain x and y fields.
Vertically, the entities are labeled in parentheses — Alien, Player, etc. Each entity has a specific set of components. More importantly, we can add or remove some components to any entity “on the fly”, in runtime, to change its structure and, consequently, its behavior and status in the game world, all without recompiling the game code! This achieves the first conceptual goal of ECS mentioned earlier — flexibility of the structure of game objects.
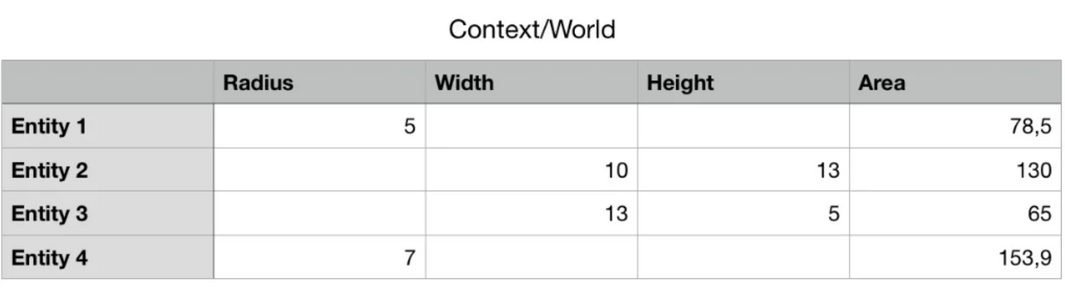
The illustration above, if you squint a little, looks a lot like an ordinary Excel spreadsheet. In essence, that’s what ECS is 😊
 (source: Maxim Zaks - Entity Component System - A Different Approach to Game / Application Development)
From a conceptual perspective, entities and components form the rows and columns of a table whose cells hold the component data or no values. This representation of game data allows us to pull off a number of tricks related to its memory layout. In turn, these tricks enable the most efficient utilization of the CPU cache when processing data, similar to the example mentioned earlier with a loop over floats, and thus squeeze maximum performance out of the “CPU-memory” system.
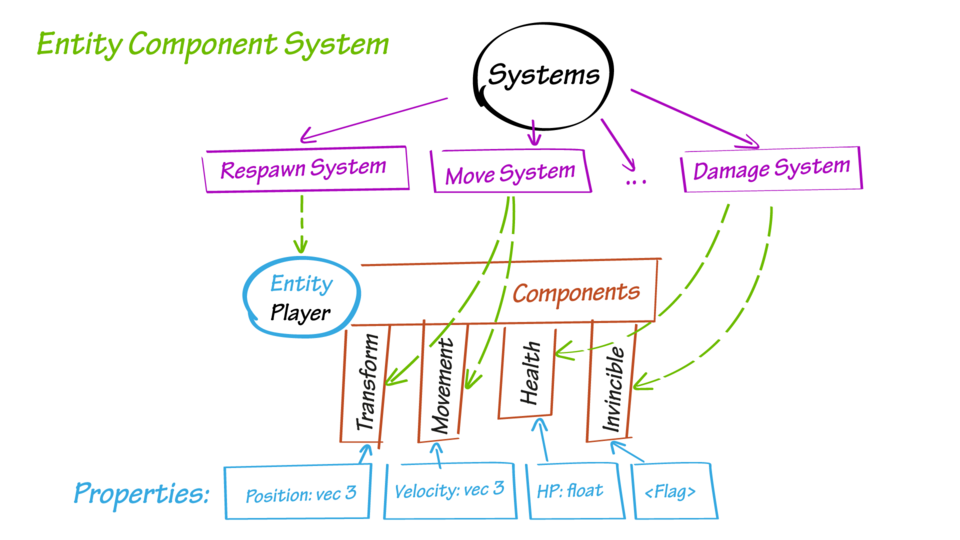
The processing of game data when using the ECS pattern is delegated to the so-called systems — loops that iterate over all entities that have certain components and perform operations on these entities in the same uniform way. For example, a system that calculates the movement of objects will process entities with Position and Movement components, a system that draws objects on the screen will be interested in entities with Position and Render components, and so on. This can be illustrated by the following example:
 (source)
In this example, the MoveSystem is essentially a loop that sequentially traverses all entities with Transform and Movement components and calculates new position values for each entity according to its velocity. Most implementations of the ECS pattern are structured so that the component field data (e.g., the x and y fields of the Movement component) are stored in flat one-dimensional arrays, and the entities are basically integer indices in those arrays. Systems, in turn, simply iterate over arrays with component data, thus achieving spatial cache locality, just like in the float loop example mentioned earlier.
This concludes the brief overview of the Entity-Component-System architectural pattern. For a deeper dive into the topic, the following resources are recommended:
- Entity component system: Wikipedia description of the pattern.
- ECS FAQ: frequently asked questions about ECS from Sander Mertens, author of the Flecs C framework.
- awesome-entity-component-system: a collection of ECS libraries and resources.
- CPU cache: a fairly detailed Wikipedia article on processor caches.
- Ulrich Drepper, What Every Programmer Should Know About Memory: A comprehensive work by one of the GNU libc developers, Ulrich Drepper, on memory structure and performance optimization.
Now we are ready to use the cl-fast-ecs library to create a minimal game project with ECS architecture. But before that, we need a configured Common Lisp development environment.
Development environment
The first thing we need to build a development environment is a compiler, and the universally recognized leader among open-source Common Lisp compilers is Steel Bank Common Lisp, aka SBCL. You can install it using your package manager with a command in the terminal like:
# for Ubuntu/Debian and their derivatives:
sudo apt-get install sbcl

# for Fedora:
sudo dnf install sbcl

# for MacOS with Homebrew:
brew install sbcl
…or download a ready-made installer from the official website (be sure to choose the CPU architecture you need; in most cases, it’s AMD64).
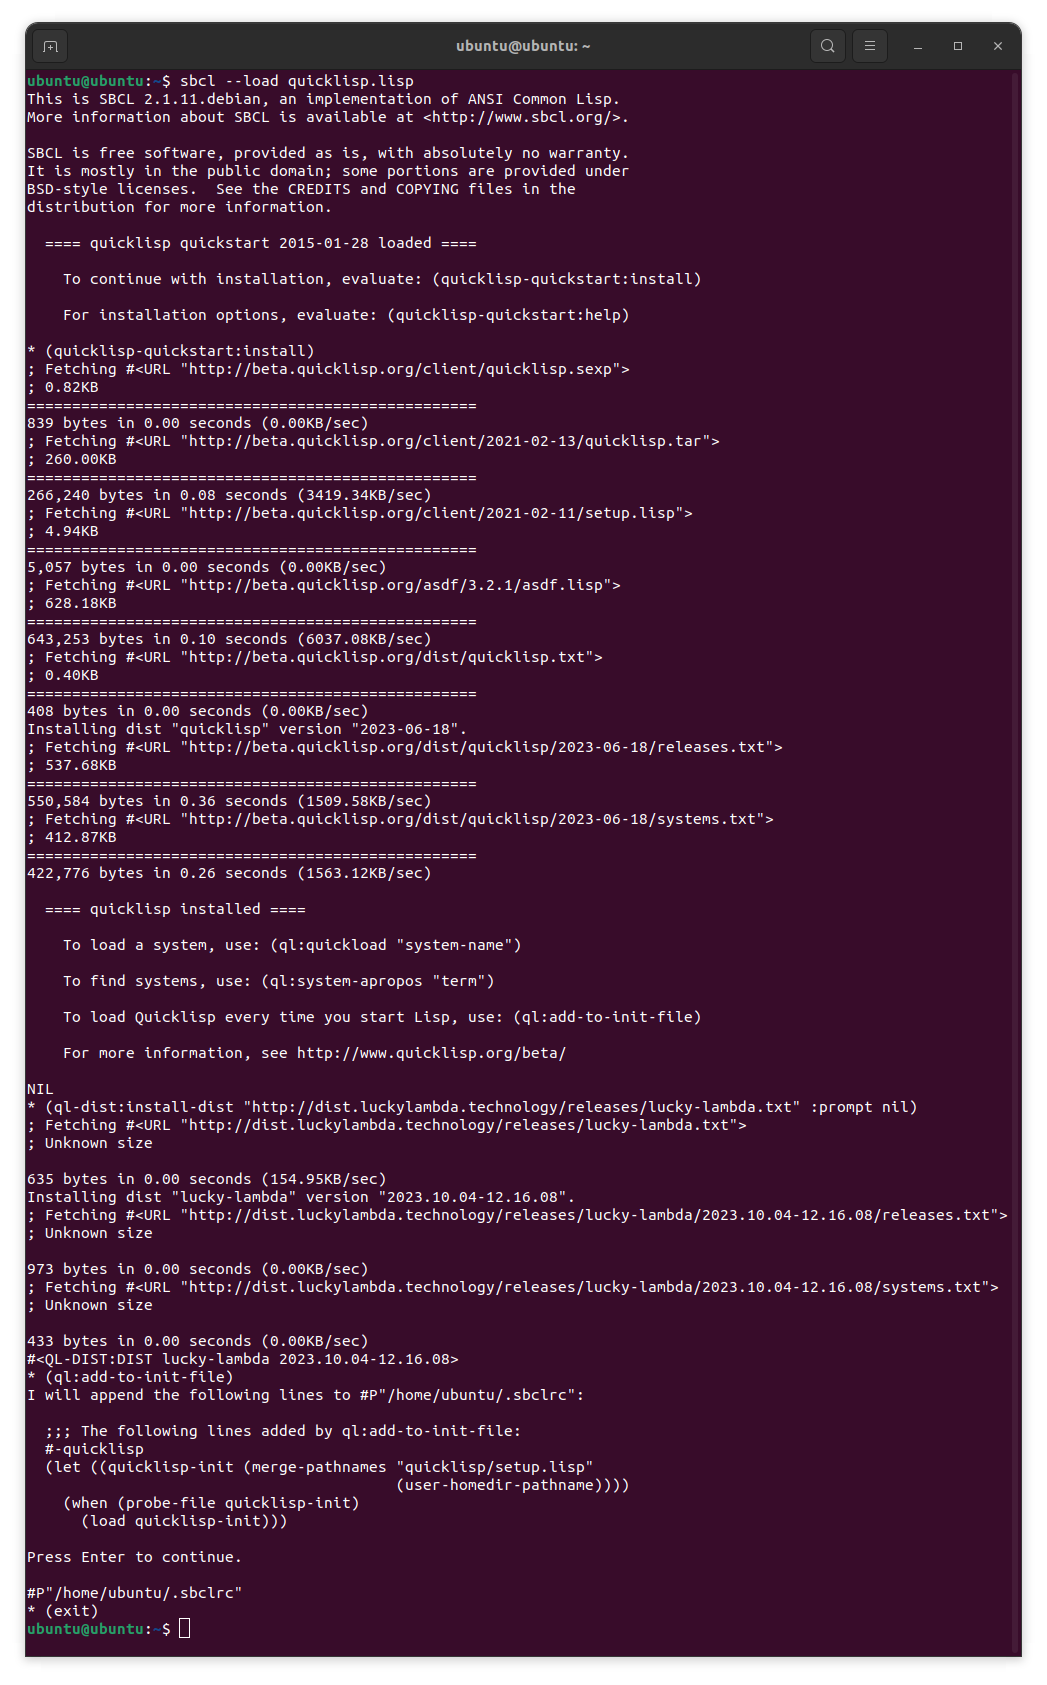
After installing the compiler, you will need to install Quicklisp, which is the de facto standard package manager for Common Lisp. To do this, download the installation file at https://beta.quicklisp.org/quicklisp.lisp , and then load it by running SBCL in the directory containing the file with the following command:
sbcl --load quicklisp.lisp
After loading this file, SBCL will enter the so-called REPL (Read-Eval-Print Loop) mode, in which it will display an input prompt consisting of a single asterisk and wait for you to input the code to be executed, and after executing it and displaying the result, it will go back to waiting for input. Let’s give SBCL three code fragments to execute: to install Quicklisp, to connect an additional LuckyLambda repository with the latest versions of gamedev packages, and to add Quicklisp support to the SBCL config:
(quicklisp-quickstart:install)

(ql-dist:install-dist "http://dist.luckylambda.technology/releases/lucky-lambda.txt" :prompt nil)

(ql:add-to-init-file)
After running the last command and pressing Enter as prompted, you can exit SBCL by pressing Ctrl-D or typing (exit) at the REPL prompt.
To write Common Lisp code with comfort and still have the ability to interact with REPL, you can choose your favorite IDE:
- VScode with the Alive extension installed; see the Common Lisp cookbook guide to using it. To make it work correctly with the SBCL we’ve installed, it’s necessary to install a few additional packages by executing the following code line in the SBCL REPL:
(ql:quickload '(:bordeaux-threads :cl-json :flexi-streams :usocket)) - IntelliJ IDEA with the SLT plugin installed; see the user guide for it.
- Sublime Text with the Slyblime plugin installed (unfortunately, the plugin does not work on Windows at the moment).
- For Vim and Neovim, there is Vlime plugin.
- However, the unrivaled leader as an IDE for Lisp-like languages is Emacs. If you’re already an experienced Emacs user, you can simply install the Sly plugin. If you don’t want to bother with configuring this environment, you can use the ready-made cross-platform Emacs build customized for Common Lisp called Portacle, and read the Emacs introduction from the Common Lisp cookbook. In order for our project to work in Portacle, you’ll need to run the following code in its REPL:
(ql-dist:install-dist "http://dist.luckylambda.technology/releases/lucky-lambda.txt" :prompt nil)
(ql:quickload :deploy)
Besides, for such an exotic OS as Windows, you’ll need a tool like MSYS2 for proper development.
Common Lisp game project template
To start our project, let’s use the cookiecutter-lisp-game template. For this you’ll need the cookiecutter Python tool installed. You can find installation instructions here. Let’s run the following command in the terminal:
cookiecutter gh:lockie/cookiecutter-lisp-game
cookiecutter will prompt you with questions about the project you’re creating. Answer them in the following manner:
full_name (Your Name): Alyssa P. Hacker
email (your@e.mail): alyssa@domain.tld
project_name (The Game): ECS Tutorial 1
project_slug (ecs-tutorial-1):
project_short_description (A simple game.): cl-fast-ecs framework tutorial.
version (0.0.1):
Select backend
    1 - liballegro
    2 - raylib
    3 - SDL2
    Choose from [1/2/3] (1): 1
cookiecutter will create a project skeleton in the ecs-tutorial-1 directory. You’ll need to add this directory to your local Quicklisp package repository with the following command:
# for UNIX-like OS:
ln -s $(pwd)/ecs-tutorial-1 $HOME/quicklisp/local-projects/

# for Windows:
mklink /j %USERPROFILE%\quicklisp\local-projects\ecs-tutorial-1 ecs-tutorial-1

# for Windows when using Portacle:
mklink /j %USERPROFILE%\portacle\projects\ecs-tutorial-1 ecs-tutorial-1
As a backend, we chose the default option #1, liballegro, because it’s currently the most hassle-free graphics framework for use in Common Lisp. You’ll also need to install it, either with the terminal command like
# for Ubuntu/Debian and their derivatives:
sudo apt-get install liballegro-acodec5-dev \
    liballegro-audio5-dev liballegro-dialog5-dev \
    liballegro-image5-dev liballegro-physfs5-dev \
    liballegro-ttf5-dev liballegro-video5-dev

# for Fedora:
sudo dnf install allegro5-addon-acodec-devel \
    allegro5-addon-audio-devel allegro5-addon-dialog-devel \
    allegro5-addon-image-devel allegro5-addon-physfs-devel \
    allegro5-addon-ttf-devel allegro5-addon-video-devel

# for MacOS with Homebrew:
brew install allegro

# for Windows with MSYS2:
pacman -S mingw-w64-x86_64-allegro
…or by downloading ready-made binaries from the official website. Additionally, because of the programming language liballegro is written in, which is pure C, you’ll need a working environment to compile the C code:
# for Ubuntu/Debian and their derivatives:
sudo apt-get install gcc pkg-config make

# for Fedora:
sudo dnf install gcc pkg-config make redhat-rpm-config

# for MacOS with Homebrew:
brew install pkg-config

# for Windows with MSYS2:
pacman -S mingw-w64-x86_64-gcc \
    mingw-w64-x86_64-pkg-config make
For Windows with MSYS2, you’ll also need to set the MSYS2_PATH_TYPE environment variable to the value inherit and add the following paths to the beginning of the PATH environment variable: C:\msys64\usr\bin;C:\msys64\mingw64\bin;
Additionally, you’ll need the libffi library for Common Lisp to interact with C code. You can install it with a command like this:
# for Ubuntu/Debian and their derivatives:
sudo apt-get install libffi-dev

# for Fedora:
sudo dnf install libffi-devel

# for MacOS with Homebrew:
brew install libffi

# for Windows with MSYS2:
pacman -S mingw-w64-x86_64-libffi
Finally, after all these preparations, you can run the project by:
- Launching
sbcl. - Loading the project package with a code like
(ql:quickload :ecs-tutorial-1) - After waiting for the input prompt in the form of an asterisk after loading, call the project entry point, the
mainfunction, by executing the following code:(ecs-tutorial-1:main)
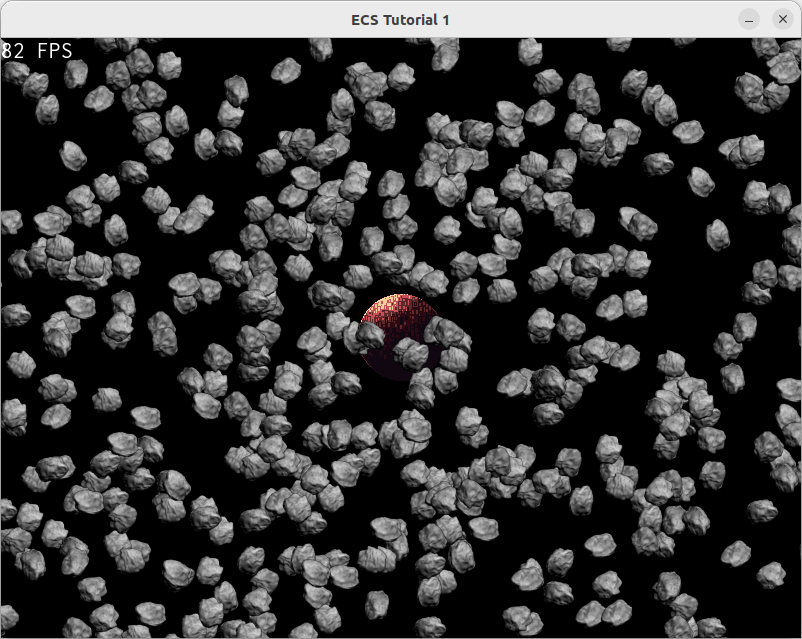
If everything goes smoothly, you’ll see an empty window with an FPS counter:
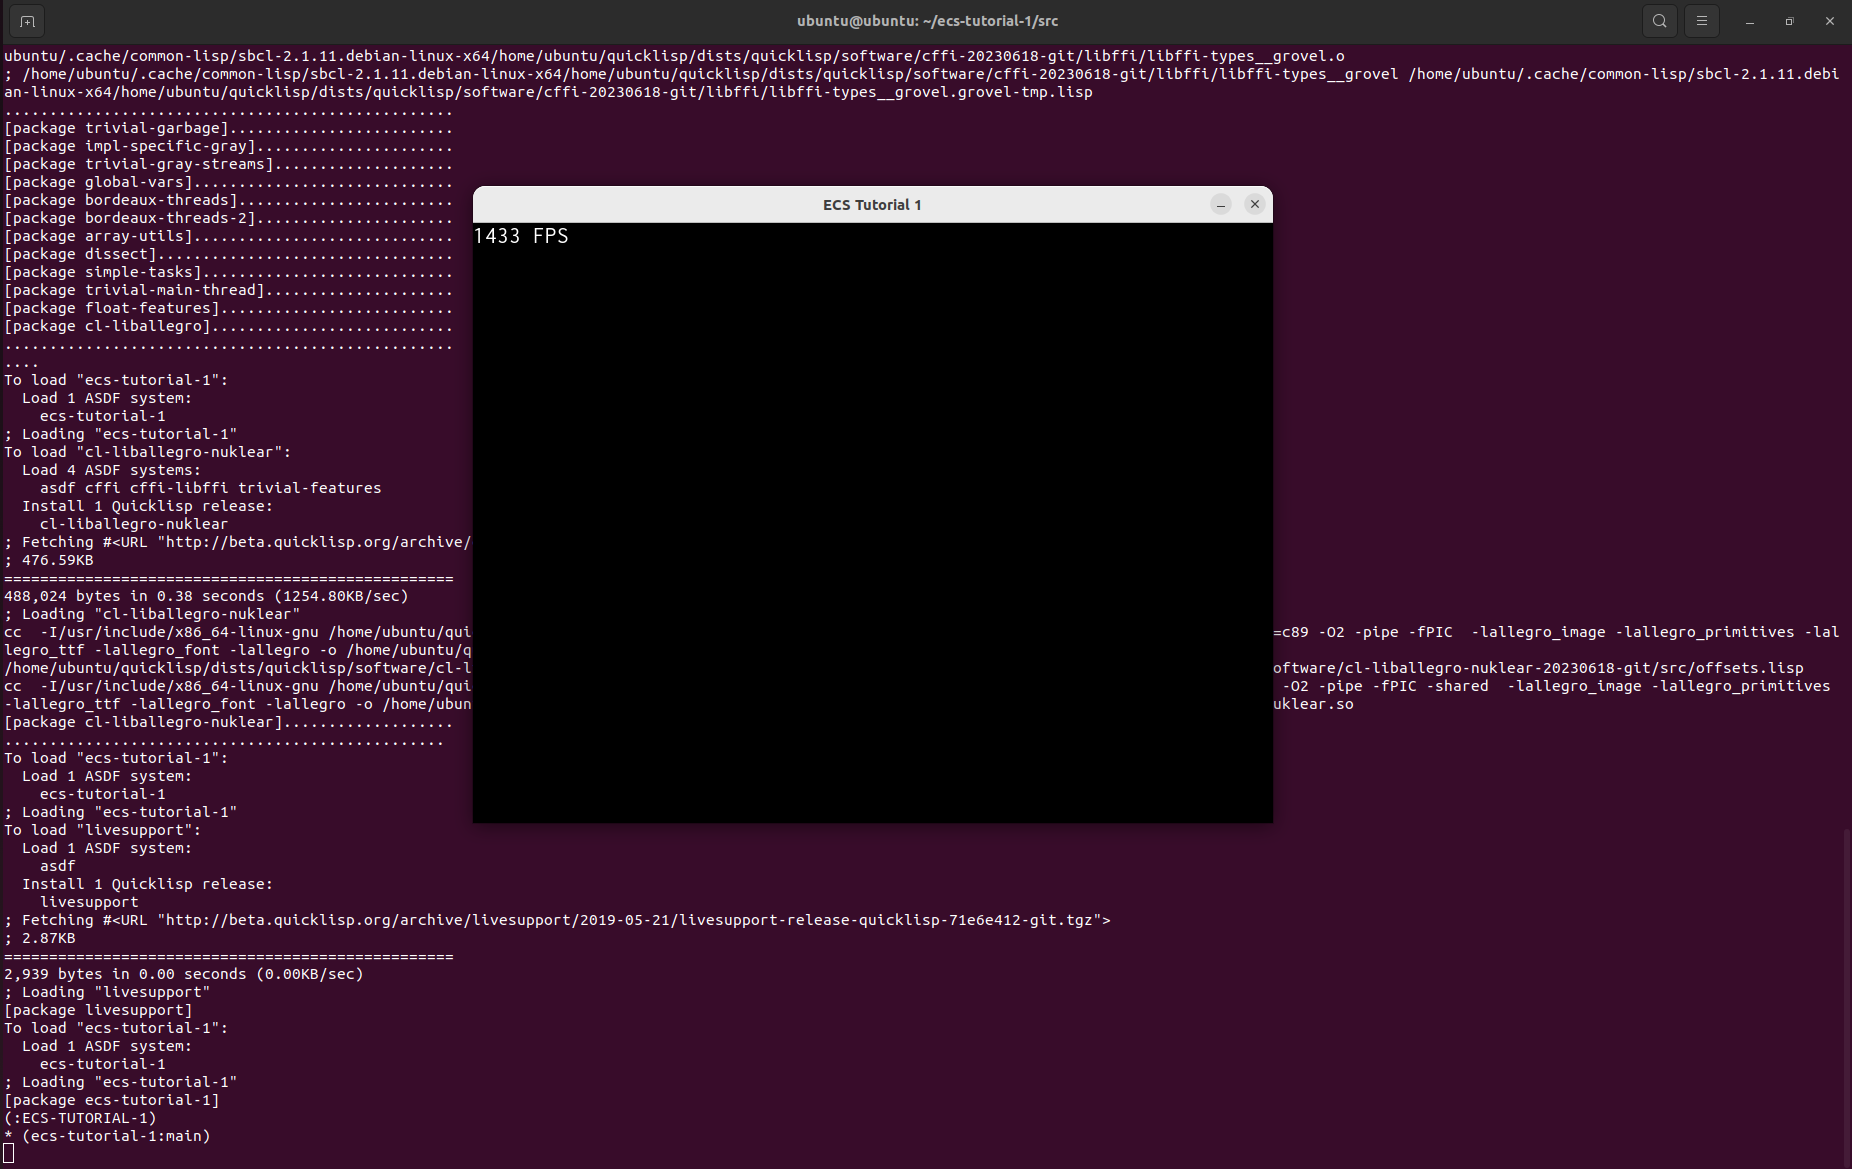
Now we can proceed to add the “meat” of components and systems to the skeleton.
Adding components and systems
First and foremost, if you’ve never dealt with Common Lisp or other Lisp-family languages, I recommend referring to a brief guide, Learn X in Y minutes, Where X=Common Lisp (studying its first six sections should be sufficient). For a deeper dive, Practical Common Lisp is an excellent resource.
The first thing we need to do is to connect the cl-fast-ecs library to our project. To do this, open the ecs-tutorial-1.asd file in the root directory of the project. The .asd extension is not the result of a random chord on the keyboard; it stands for “Another System Definition”, and it’s the de facto standard for describing Common Lisp packages. In this file, you need to add an element #:cl-fast-ecs to the list that is the value of the keyword parameter :depends-on, so that it looks like this:
  ;; ...
  :license "MIT"
  :depends-on (#:alexandria
               #:cl-fast-ecs
               #:cl-liballegro
               #:cl-liballegro-nuklear
               #:livesupport)
  :serial t
  ;; ...
After that, you should (re)load the package with the future game in REPL using the familiar command (ql:quickload :ecs-tutorial-1). Now we are ready to dive into the source code.
So, let’s open the src/main.lisp file. Don’t be frightened by the code inside the form starting with the symbols cffi:defcallback %main. This is a standard boilerplate, similar to what can be found in any program using liballegro. For instance, you can find a similar boilerplate in the code of the “skater” demo from the official library website. This boilerplate deals with initialization and finalization of liballegro and its addons necessary for the game to function, error handling and rendering of the FPS counter you’ve already seen. However, its central part is the main game loop, which sequentially draws the game frames on the screen. You can read more about what the main game loop is here. We won’t interfere with the %main callback code. Instead, we’ll extend the init and update functions which it calls to initialize the game logic and update the game’s internal state on each frame respectively.
Let’s start editing the code by initializing the cl-fast-ecs framework. If we try to use its functions without initialization, for example, run the code for creating a new entity (ecs:make-entity) in REPL right now (try it!), we will get an error like The variable CL-FAST-ECS:*STORAGE* is unbound. It happens not because the author forgot to define the variable *storage* in the framework code, but because it is not bound to any value yet. To bind it to a newly created ECS data storage object, you need to call the bind-storage function. The most logical place to do this in the game code is the init function:
(defun init ()
  (ecs:bind-storage))
Having written this code, we must turn it into a part of our program. Here an essential aspect of Lisp we discussed earlier, which is rare in other mainstream languages, comes into play: interactivity. It’s not necessary to close the currently running SBCL process. Just put the cursor on the function code and use the keyboard combination of your IDE that sends the code to the running REPL. For example, in Emacs it is double-press of Ctrl-C (or C-c C-c in its lingo). In other IDEs the corresponding context menu item will be called “Inline eval”, “Evaluate This S-expression”, “Evaluate form at cursor” or similar. Furthermore, when using the livesupport library (which is included in our template), you can redefine code fragments or entire functions not only when Lisp awaits your input, but at any moment of program execution. This feature opens up truly limitless possibilities for code modification and debugging “on the fly”. There is a well-known example of how Lisp interactivity was used to bring to life a spacecraft 150 million miles away from the Earth.
 (source: NASA/JPL)
Now we’re ready to define the components that our game simulation will use. We’ll be modeling the Newtonian physics of a large number of celestial bodies. To do this, we will certainly need components for the position and speed of objects structured in a similar way. Let’s add the following code that uses the define-component macro from the cl-fast-ecs framework just before the init function at the top level:
(ecs:define-component position
  "Determines the location of the object, in pixels."
  (x 0.0 :type single-float :documentation "X coordinate")
  (y 0.0 :type single-float :documentation "Y coordinate"))

(ecs:define-component speed
  "Determines the speed of the object, in pixels/second."
  (x 0.0 :type single-float :documentation "X coordinate")
  (y 0.0 :type single-float :documentation "Y coordinate"))
Each call to this macro takes as input the name of a component, an optional documentation string, and a set of component fields, or slots as structure fields are commonly called in CL. For each slot, just like for structure slots, we specify in parentheses:
- name,
- default value,
- keyword parameter
:typedefining the type of the field, - optional keyword parameter
:documentationadding a documentation string to the slot.
The define-component call contains a minimum of redundant information and is very straightforward. However, in actuality the macro generates quite a substantial amount of code to support component operations. You can look at it by passing the quoted macro call to the standard macroexpand function in REPL:
(macroexpand
 '(ecs:define-component position
   "Determines the location of the object, in pixels."
   (x 0.0 :type single-float :documentation "X coordinate")
   (y 0.0 :type single-float :documentation "Y coordinate")))
I warn you right away, the result can look overwhelming 😅 It might seem that the compiler is SCREAMING AT YOU because the generated code is in uppercase, but in fact automatic symbol-to-uppercase conversion is a historical feature that can be disabled by tweaking the readtable-case setting. Typically no one bothers with that. You can also have a look at the generated code here.
The code generated by the macro includes not only a description of the structure that stores position component data for all entities and is automatically added to the common object data storage, but also a set of auxiliary functions and macros (yes, yes, macros can define other macros 🤯). Those allow:
- to get and set the
xandyslot values, - to add and remove a
positioncomponent from a given entity, - to copy
positioncomponent data from one entity to another, - to check if the
positioncomponent exists for a given entity, - to easily access slots by name.
As part of this tutorial series, we’ll eventually try them all.
Let’s add one more component before init, which will allow us to draw images corresponding to our celestial bodies on the screen:
(ecs:define-component image
  "Stores ALLEGRO_BITMAP structure pointer, size and scaling information."
  (bitmap (cffi:null-pointer) :type cffi:foreign-pointer)
  (width 0.0 :type single-float)
  (height 0.0 :type single-float)
  (scale 1.0 :type single-float))
In addition to the C pointer to the ALLEGRO_BITMAP image structure from liballegro, this component also stores the image size and scaling information.
Now let’s implement our first system that will display objects on the screen. Add the following code after the component definitions:
(ecs:define-system draw-images
  (:components-ro (position image)
   :initially (al:hold-bitmap-drawing t)
   :finally (al:hold-bitmap-drawing nil))
  (let ((scaled-width (* image-scale image-width))
        (scaled-height (* image-scale image-height)))
    (al:draw-scaled-bitmap image-bitmap 0 0
                           image-width image-height
                           (- position-x (* 0.5 scaled-width))
                           (- position-y (* 0.5 scaled-height))
                           scaled-width scaled-height 0)))
Defining a system is slightly more complex than defining a component, as it involves the actual entity processing code. The arguments of the define-system macro are: the name of the system, a set of named options in parentheses, and then the forms that make up the body of the system — the code executed for each entity in which the system is interested. This interest is specified with the :components-ro option, where “ro” stands for “read-only”: we will process all entities that have position and image components, but we won’t modify them. In the body of the system, for each such entity, we calculate the scaled dimensions of the image and put them into the scaled-width and scaled-height variables using the special form let. We then call the al_draw_scaled_bitmap function from liballegro to render the image according to the specified position and scale. Note that to access the slots of the components of the processed entity, we use variables in the form component-slot, like image-width or position-y. These variables are automatically generated for us to use by the define-system macro. Additionally, we use the :initially and :finally system options, similar to the corresponding keywords in the standard LISP loop construct: expressions from these options will be executed at the very beginning and at the very end of the system, respectively. We call the al_hold_bitmap_drawing function at these moments to activate liballegro’s built-in sprite batching, which ensures that all the calls to the graphics APIs necessary for drawing will occur only after we’ve processed all the objects, saving expensive bus communications between CPU and GPU.
To see the results of our work on the screen, we need two things:
- create some number of objects with random positions,
- and call our system every frame.
Let’s start with the first point.
First, we need images for our celestial bodies. Download them from this page of the OpenGameArt website (click the “File(s)” link):
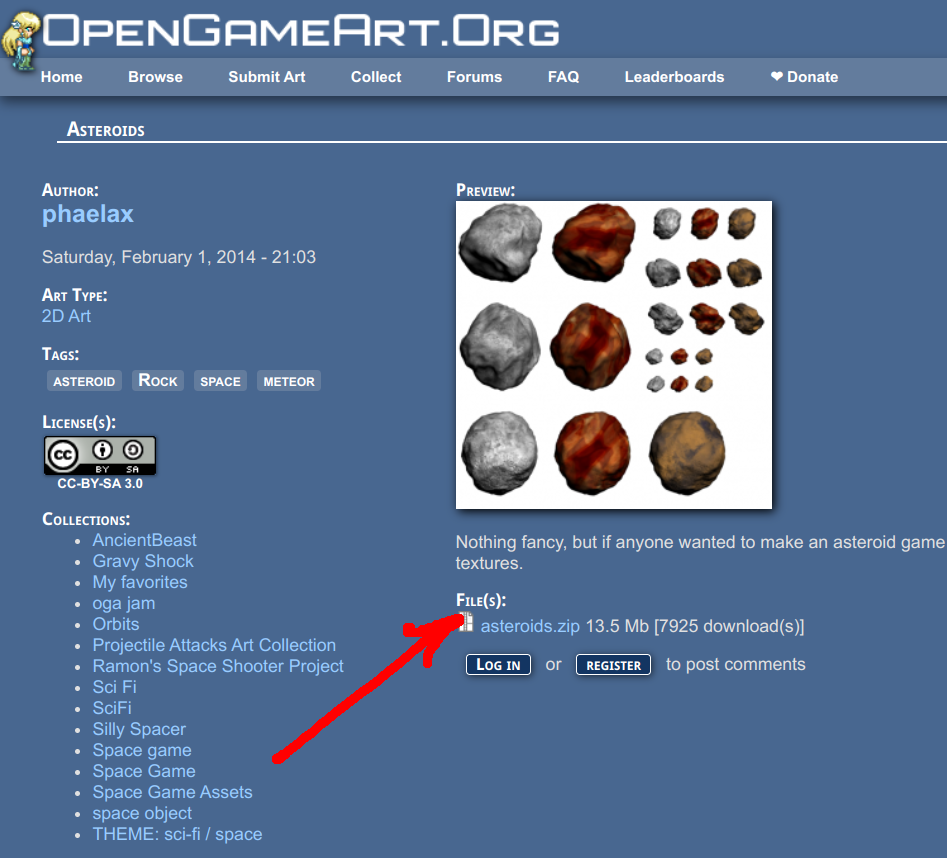
Let’s unpack the small directory from the downloaded archive into our Resources directory, so that the PNG files are available to our application by paths like Resources/a10000.png. In order to keep things simple, let’s just hardcode the necessary images as a constant list before the init function:
(define-constant asteroid-images
    '("../Resources/a10000.png" "../Resources/a10001.png"
      "../Resources/a10002.png" "../Resources/a10003.png"
      "../Resources/a10004.png" "../Resources/a10005.png"
      "../Resources/a10006.png" "../Resources/a10007.png"
      "../Resources/a10008.png" "../Resources/a10009.png"
      "../Resources/a10010.png" "../Resources/a10011.png"
      "../Resources/a10012.png" "../Resources/a10013.png"
      "../Resources/a10014.png" "../Resources/a10015.png"
      "../Resources/b10000.png" "../Resources/b10001.png"
      "../Resources/b10002.png" "../Resources/b10003.png"
      "../Resources/b10004.png" "../Resources/b10005.png"
      "../Resources/b10006.png" "../Resources/b10007.png"
      "../Resources/b10008.png" "../Resources/b10009.png"
      "../Resources/b10010.png" "../Resources/b10011.png"
      "../Resources/b10012.png" "../Resources/b10013.png"
      "../Resources/b10014.png" "../Resources/b10015.png")
  :test #'equalp)
Note for MacOS users: there’s currently unresolved bug in liballegro, which causes it to incorrectly display PNG images with 16-bit color on MacOS. Thus under this OS you’ll need to convert them to 8-bit format using the command like
mogrify -depth 8 *.png
after installing imagemagick from Homebrew. Thanks to Marcus for the bug report!
Then, add the following code to the init function after the bind-storage call:
  (let ((asteroid-bitmaps
          (map 'list
               #'(lambda (filename)
                   (al:ensure-loaded
                    #'al:load-bitmap filename))
               asteroid-images)))
    (dotimes (_ 1000)
      (ecs:make-object `((:position
                          :x ,(float (random +window-width+))
                          :y ,(float (random +window-height+)))
                         (:image
                          :bitmap ,(alexandria:random-elt
                                    asteroid-bitmaps)
                          :width 64.0 :height 64.0)))))
In this code, we load all hardcoded images into the asteroid-bitmaps list using the al_load_bitmap function and the helper Lisp function al:ensure-loaded. After that, we use the ECS framework function make-object in a loop with a thousand iterations. This function constructs an entity with components defined by the provided specification — a list of the form
'((:component1 :slot1 "value1" :slot2 "value2")
  (:component2 :slot "value")
  ;; ...
 )
Additionally, we use a distinctive feature of Common Lisp that blurs the thin line between data and code, and is often encountered when writing macros, the so-called quasiquoting. It allows us to construct lists of arbitrary nesting level by inserting the results of some code execution into the required places in the list. In our case, this involves calls to the standard function random, which returns a random number in a given range, and float, which converts its argument to a floating-point number (since liballegro uses float as coordinate type). Also, to randomly select an image, we use the random-elt function from the alexandria library, which includes a lot of useful functions (basically, this library is to Common Lisp what GLib is to C or boost is to C++).
Now, the second point: calling the system. This is taken care of for us by the run-systems function in the ECS framework, since it runs all systems registered via define-system. It’s interesting to note that, although our template code separates the update and render steps in the main game loop, with ECS we don’t have to explicitly define separate functions for world updates and on-screen rendering. With ECS, the game code is concentrated within systems, and we have the flexibility to arbitrarily define the execution order of systems relative to each other. So, we simply add a call to run-systems to the update function in our template, after the FPS calculation code:
(defun update (dt)
  (unless (zerop dt)
    (setf *fps* (round 1 dt)))
  (ecs:run-systems))
Let’s leave the render function as it is, despite the TODO comment inviting to put the drawing code there. In our setup, this function is only responsible for the FPS counter.
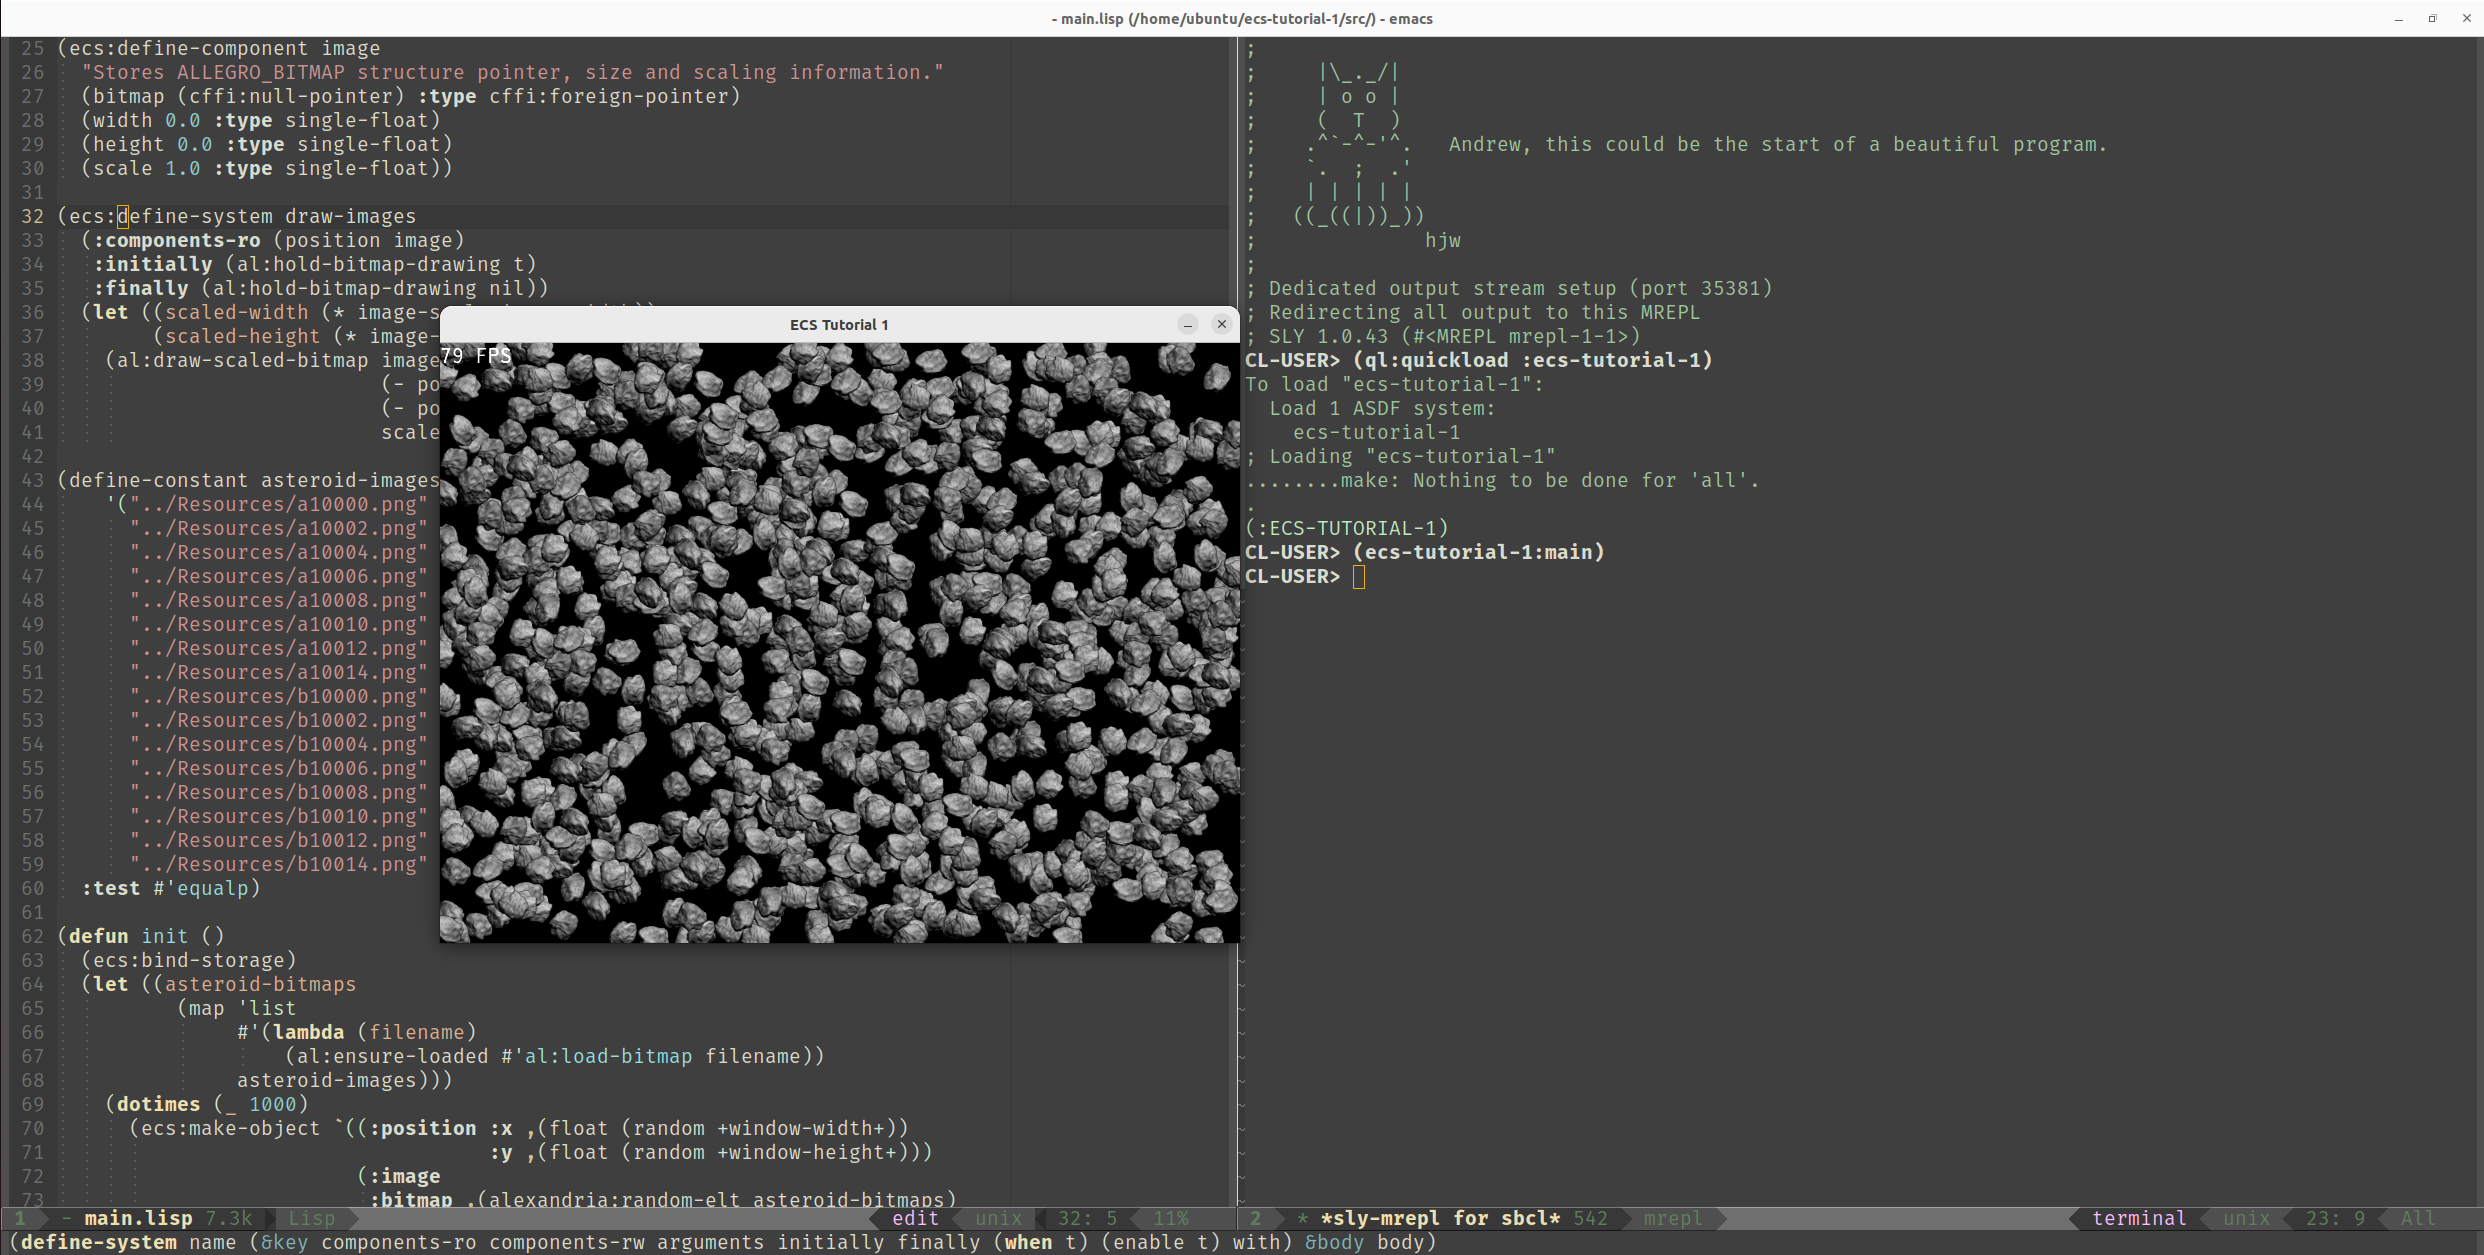
After sending the new code — the asteroid-images constant, new bodies of init and update functions, position, speed and image component definitions, and the draw-images system — to a running Lisp process using the C-c C-c keys (or the equivalent for your IDE) and running (ecs-tutorial-1:main), you should be able to observe the following result:
Physics
Now let’s add a bit of Newtonian physics. We have the speed component, so it makes sense to use it to calculate the current position of the object. Let’s create a separate system called move for this purpose:
(ecs:define-system move
  (:components-ro (speed)
   :components-rw (position)
   :arguments ((:dt single-float)))
  (incf position-x (* dt speed-x))
  (incf position-y (* dt speed-y)))
This time, we will modify the position component of the entities of interest, so we specify it in the list corresponding to the components-rw option. Additionally, our system will need the actual time elapsed since the previous frame as an argument, to ensure the physical correctness of what’s happening on the screen. For simplicity, this argument will also be a single-precision floating-point number, single-float. We call it dt and specify it along with its type in the arguments system option. Finally, the system code simply increments the position values using the standard incf macro, similar to the += operator from C-like languages, by the value of dt multiplied by the corresponding speed component.
In order for this system to do its job, we also need to add the speed component to our objects. To do this, modify the snippet for creating the objects in the init function as follows:
  (let ((asteroid-bitmaps
          (map 'list
               #'(lambda (filename)
                   (al:ensure-loaded
                    #'al:load-bitmap filename))
               asteroid-images)))
    (dotimes (_ 1000)
      (ecs:make-object `((:position
                          :x ,(float (random +window-width+))
                          :y ,(float (random +window-height+)))
                         (:speed :x ,(- (random 100.0) 50.0)
                                 :y ,(- (random 100.0) 50.0))
                         (:image
                          :bitmap ,(alexandria:random-elt
                                    asteroid-bitmaps)
                          :width 64.0 :height 64.0)))))
However, running the ecs-tutorial-1:main function again after sending the move system and the new init function code to the Lisp process by means of your IDE yields the following error right in the move-system function:
The value
  NIL
is not of type
  NUMBER
   [Condition of type TYPE-ERROR]
Let’s terminate the main function by selecting the default ABORT restart from the Restarts list and try to figure out what went wrong.
Upon closer examination of the new code, you may notice that we forgot to pass the dt parameter to the new move system. It is already computed for us in the template code and passed to the update function. All we have to do is convert it from double precision double-float to single precision and pass it to the ecs:run-system function called in update. run-systems accepts any number of keyword parameters and passes them to the systems by name as needed:
(defun update (dt)
  (unless (zerop dt)
    (setf *fps* (round 1 dt)))
  (ecs:run-systems :dt (float dt 0.0)))
Running main after sending a new definition of the update function to the Lisp process, you should observe asteroids slowly drifting apart:
Note that the demo still maintains reasonable FPS values. Moreover, out of curiosity, we can take a look at the machine code generated by the compiler for our last system, move, using the standard CL disassemble function:
(disassemble (ecs:system-exists-p :move))
As a result, we can see (for the release build generated for us by the package.sh script from the template) something like this:
; disassembly for ECS-TUTORIAL-1::MOVE-SYSTEMG5
; Size: 210 bytes. Origin: #x538B2811                          ; ECS-TUTORIAL-1::MOVE-SYSTEMG5
; 11:       488B0508FFFFFF   MOV RAX, [RIP-248]                ; 'CL-FAST-ECS:*STORAGE*
; 18:       8B48F5           MOV ECX, [RAX-11]
; 1B:       4A8B0C29         MOV RCX, [RCX+R13]
; 1F:       4883F9FF         CMP RCX, -1
; 23:       480F444801       CMOVEQ RCX, [RAX+1]
; 28:       488B4125         MOV RAX, [RCX+37]
; 2C:       488B4801         MOV RCX, [RAX+1]
; 30:       488B712D         MOV RSI, [RCX+45]
; 34:       488B5935         MOV RBX, [RCX+53]
; 38:       488B4009         MOV RAX, [RAX+9]
; 3C:       4C8B582D         MOV R11, [RAX+45]
; 40:       4C8B7035         MOV R14, [RAX+53]
; 44:       498B42F9         MOV RAX, [R10-7]
; 48:       4C8B52F9         MOV R10, [RDX-7]
; 4C:       488BD0           MOV RDX, RAX
; 4F:       EB35             JMP L2
; 51:       660F1F840000000000 NOP
; 5A:       660F1F440000     NOP
; 60: L0:   4D8B41F9         MOV R8, [R9-7]
; 64:       488BCA           MOV RCX, RDX
; 67:       48D1F9           SAR RCX, 1
; 6A:       488BC1           MOV RAX, RCX
; 6D:       48C1E806         SHR RAX, 6
; 71:       498B44C001       MOV RAX, [R8+RAX*8+1]
; 76:       480FA3C8         BT RAX, RCX
; 7A:       7217             JB L3
; 7C: L1:   488BCA           MOV RCX, RDX
; 7F:       4883C102         ADD RCX, 2
; 83:       488BD1           MOV RDX, RCX
; 86: L2:   4C39D2           CMP RDX, R10
; 89:       7ED5             JLE L0
; 8B:       BA17010050       MOV EDX, #x50000117               ; NIL
; 90:       C9               LEAVE
; 91:       F8               CLC
; 92:       C3               RET
; 93: L3:   488BC2           MOV RAX, RDX
; 96:       F3410F10544301   MOVSS XMM2, [R11+RAX*2+1]
; 9D:       66480F6ECF       MOVQ XMM1, RDI
; A2:       0FC6C9FD         SHUFPS XMM1, XMM1, #4r3331
; A6:       F30F59D1         MULSS XMM2, XMM1
; AA:       F30F104C4601     MOVSS XMM1, [RSI+RAX*2+1]
; B0:       F30F58CA         ADDSS XMM1, XMM2
; B4:       F30F114C4601     MOVSS [RSI+RAX*2+1], XMM1
; BA:       488BC2           MOV RAX, RDX
; BD:       F3410F104C4601   MOVSS XMM1, [R14+RAX*2+1]
; C4:       66480F6EDF       MOVQ XMM3, RDI
; C9:       0FC6DBFD         SHUFPS XMM3, XMM3, #4r3331
; CD:       F30F59D9         MULSS XMM3, XMM1
; D1:       F30F10544301     MOVSS XMM2, [RBX+RAX*2+1]
; D7:       F30F58DA         ADDSS XMM3, XMM2
; DB:       F30F115C4301     MOVSS [RBX+RAX*2+1], XMM3
; E1:       EB99             JMP L1
And this is indeed an impressive result: the machine code that calculates the positions of an arbitrary number of objects according to physical considerations does not call any external functions and occupies only 210 bytes! Moreover, if you have a basic skill of reading assembler, you can see the body of the loop that processes our objects. It starts with the label L3 and consists of only 17 (!) machine instructions, which also go with the flow of CPU cache ensuring high performance.
However, we digress. To make the simulation more fun than just asteroids flying around, let’s add a massive planetary body to it, turning the demo into a simulation of space debris orbiting a planet.
Let’s use the following content from OpenGameArt: Space Background. Besides a nice planet, the archive also contains some charming space backgrounds. Unpack the layers directory from the downloaded archive into our Resources directory, so that the PNG files are available to our application by the paths like Resources/parallax-space-big-planet.png.
In order to see the planet on the screen, we need to create a corresponding entity in the init function. First of all, before definitions of all our ECS systems, let’s create global variables with the characteristics of the planet, we will need them later:
(declaim
 (type single-float
       *planet-x* *planet-y* *planet-width* *planet-height* *planet-mass*))
(defvar *planet-x*)
(defvar *planet-y*)
(defvar *planet-width*)
(defvar *planet-height*)
(defvar *planet-mass* 500000.0)
Note that in Common Lisp it is customary to add “earmuffs” — asterisks at the beginning and at the end — to the names of global variables, to emphasize that they are special in a sense that they use dynamic scoping rules instead of lexical. Additionally, before defining variables using the standard defvar macro, we declare their type, single-float, which is a floating-point number with single precision, using the declaim macro with the type parameter. This is optional, since Common Lisp has gradual typing, but it’ll positively affect the performance of the code that uses these variables.
Now let’s create the planet entity with the following new code snippet in the init function after the ecs:bind-storage call:
  (let ((planet-bitmap
          (al:ensure-loaded
           #'al:load-bitmap
           "../Resources/parallax-space-big-planet.png")))
    (setf *planet-width*
          (float (al:get-bitmap-width planet-bitmap))
          *planet-height*
          (float (al:get-bitmap-height planet-bitmap))
          *planet-x* (/ +window-width+ 2.0)
          *planet-y* (/ +window-height+ 2.0))
    (ecs:make-object `((:position :x ,*planet-x*
                                  :y ,*planet-y*)
                       (:image :bitmap ,planet-bitmap
                               :width ,*planet-width*
                               :height ,*planet-height*))))
Here we load an image with the planet using the already familiar al_load_bitmap and al:ensure-loaded functions. Then, using straightforward arithmetic and the al_get_bitmap_width and al_get_bitmap_height functions, we create an entity with the image exactly in the middle of the screen, storing its coordinates and dimensions in the corresponding global variables using the setf macro.
After sending the new code to the Lisp process — global variable definitions via defvar and the modified init function — and restarting the main function, you will see the planet:
More physics
Now let’s add more realism — let objects crash when they collide with the planet. For simplicity, we’ll consider the planet as an ellipse. Let’s implement another system for collision detection, naming it crash-asteroids:
(ecs:define-system crash-asteroids
  (:components-ro (position)
   :with ((planet-half-width planet-half-height)
          :of-type (single-float single-float)
          := (values (/ *planet-width* 2.0)
                     (/ *planet-height* 2.0))))
  (when (<= (+
             (expt
              (/ (- position-x *planet-x*) planet-half-width)
              2)
             (expt
              (/ (- position-y *planet-y*) planet-half-height)
              2))
            1.0)
    (ecs:delete-entity entity)))
In its definition, we use the :with system option, which allows us to define local variables once at the beginning of the system execution. These variables will be available within the system’s body. We use this feature to calculate the semiaxes of the planet to plug them into the ellipse equation
to determine whether an object collides with the planet. If this condition is true, we delete the object by calling the delete-entity function with the entity variable automatically created for us by the define-system macro for the currently processed entity.
Note that you don’t even have to close the simulation window and restart the main function! By sending the crash-asteroids system definition to the Lisp process, you immediately change the behavior of our simulation according to the rules encoded in the new system. However, using this opportunity, you will encounter an unexpected effect — the planet disappears!
If you look closely at the new system, you can understand the essence of the problem: the code in crash-asteroids does not distinguish between asteroids and the planet. It just processes all entities with the position component one after another. Since the coordinates of the planet center are quite surely inside the ellipse formed by the width and height of its image, it gets deleted at the very first run of the crash-asteroids system.
In order to correct this issue, let’s use a technique often used in ECS-architecture applications, known as the tag component. We’ll create an empty component with no slots, which will serve as a kind of “tag” or “label”. When added to an entity, it will signal some boolean feature, in this case, whether the object is a planet:
(ecs:define-component planet
  "Tag component to indicate that entity is a planet.")
Then modify the init function so that the newly created component is added to the planet entity:
    (ecs:make-object `((:planet)
                       (:position :x ,*planet-x*
                                  :y ,*planet-y*)
                       (:image :bitmap ,planet-bitmap
                               :width ,*planet-width*
                               :height ,*planet-height*)))
Also, while we’re at it, let’s add a little c̶o̶s̶m̶i̶c̶ cosmetic touch by making the asteroids inside our 1000-iteration loop to have random sizes:
      (ecs:make-object `((:position
                          :x ,(float (random +window-width+))
                          :y ,(float (random +window-height+)))
                         (:speed :x ,(- (random 100.0) 50.0)
                                 :y ,(- (random 100.0) 50.0))
                         (:image
                          :bitmap ,(alexandria:random-elt
                                    asteroid-bitmaps)
                          :scale ,(+ 0.1 (random 0.9))
                          :width 64.0 :height 64.0)))
Finally, let’s modify the crash-asteroids system to skip entities with the planet component. To do this, we use the :components-no option to the define-system macro, in which we can specify a list of components that should not be had by entities processed by the system:
(ecs:define-system crash-asteroids
  (:components-ro (position)
   :components-no (planet)
   :with ((planet-half-width planet-half-height)
          :of-type (single-float single-float)
          := (values (/ *planet-width* 2.0)
                     (/ *planet-height* 2.0))))
  (when (<= (+
             (expt
              (/ (- position-x *planet-x*) planet-half-width)
              2)
             (expt
              (/ (- position-y *planet-y*) planet-half-height)
              2))
            1.0)
    (ecs:delete-entity entity)))
By sending the new definitions (planet component, init function and crash-asteroids system) to the Lisp process and restarting ecs-tutorial-1:main, we can observe the following virtual snow globe:
Even more physics
Finally, let us add the gravitational force of the planet to the factors affecting the simulated objects. We will neglect the mutual attraction of asteroids for simplicity. To do this, we need a new component — acceleration:
(ecs:define-component acceleration
  "Determines the acceleration of the object, in pixels/second^2."
  (x 0.0 :type single-float :documentation "X coordinate")
  (y 0.0 :type single-float :documentation "Y coordinate"))
Next, let’s introduce a system that will use acceleration to influence the speed vector, and name it accelerate:
(ecs:define-system accelerate
  (:components-ro (acceleration)
   :components-rw (speed)
   :arguments ((:dt single-float)))
  (incf speed-x (* dt acceleration-x))
  (incf speed-y (* dt acceleration-y)))
However, the main character in the gravity story will be the effect of planet mass on our asteroids. We already have a global variable with the mass of the planet, *planet-mass*. Through some simple algebraic manipulations, we derive expressions for acceleration from the law of universal gravitation and Newton’s 2nd law:


where
 is the angle between the planet and the asteroid, and
 is the distance between them.
Assuming that the gravitational constant G is already included as a multiplier in the *planet-mass* variable, let us create a new system named pull to calculate the asteroid acceleration using the above formulas:
(ecs:define-system pull
  (:components-ro (position)
   :components-rw (acceleration))
  (let* ((distance-x (- *planet-x* position-x))
         (distance-y (- *planet-y* position-y))
         (angle (atan distance-y distance-x))
         (distance-squared (+ (expt distance-x 2)
                              (expt distance-y 2)))
         (acceleration (/ *planet-mass* distance-squared)))
    (setf acceleration-x (* acceleration (cos angle))
          acceleration-y (* acceleration (sin angle)))))
Finally, in the init function, let’s add an acceleration component to our asteroids:
      (ecs:make-object `((:position
                          :x ,(float (random +window-width+))
                          :y ,(float (random +window-height+)))
                         (:speed :x ,(- (random 100.0) 50.0)
                                 :y ,(- (random 100.0) 50.0))
                         (:acceleration)
                         (:image
                          :bitmap ,(alexandria:random-elt
                                    asteroid-bitmaps)
                          :scale ,(+ 0.1 (random 0.9))
                          :width 64.0 :height 64.0)))
By sending the definitions of the acceleration component, as well as the init function and the accelerate and pull systems to the Lisp process, we get a similar picture of a snow globe, only now the asteroids swarm around the planet more eagerly.
To make the simulation more interesting, let’s set it up as if a satellite near the planet has been destroyed, and a large amount of its debris, attracted by the planet, forms rings. Change the code for creating asteroids in the init function to the following:
  (let ((asteroid-bitmaps
          (map 'list
               #'(lambda (filename)
                   (al:ensure-loaded
                    #'al:load-bitmap filename))
               asteroid-images)))
    (dotimes (_ 5000)
      (let ((r (random 20.0))
            (angle (float (random (* 2 pi)) 0.0)))
        (ecs:make-object
         `((:position :x ,(+ 200.0 (* r (cos angle)))
                      :y ,(+ *planet-y* (* r (sin angle))))
           (:speed :x ,(+ -5.0 (random 15.0))
                   :y ,(+ 30.0 (random 30.0)))
           (:acceleration)
           (:image
            :bitmap ,(alexandria:random-elt asteroid-bitmaps)
            :scale ,(+ 0.1 (random 0.9))
            :width 64.0 :height 64.0))))))
Also, as a final cosmic touch, let’s use the star backgrounds from our resources by adding the following code to the init function, right after bind-storage call:
  (let ((background-bitmap-1
          (al:ensure-loaded
           #'al:load-bitmap
           "../Resources/parallax-space-stars.png"))
        (background-bitmap-2
          (al:ensure-loaded
           #'al:load-bitmap
           "../Resources/parallax-space-far-planets.png")))
    (ecs:make-object
     `((:position :x 400.0 :y 200.0)
       (:image
        :bitmap ,background-bitmap-1
        :width
        ,(float (al:get-bitmap-width background-bitmap-1))
        :height
        ,(float (al:get-bitmap-height background-bitmap-1)))))
    (ecs:make-object
     `((:position :x 100.0 :y 100.0)
       (:image
        :bitmap ,background-bitmap-2
        :width
        ,(float (al:get-bitmap-width background-bitmap-2))
        :height
        ,(float (al:get-bitmap-height background-bitmap-2))))))
These initial parameters will lead to the following mesmerizing simulation behavior:
Note that the physical simulation of five thousand objects easily fits within the 60 frames per second limit, further confirming the efficiency of the code built using the Entity-Component-System pattern. And the amount of code we wrote, totaling 250 lines (including boilerplate and hardcode) confirms high expressiveness of the Lisp language and the power of metalinguistic abstraction.
You can change the simulation’s initial parameters in the init function to create your own visual masterpieces. Please share your results in the comments 😊
Conclusion
In this tutorial, we’ve built a 2D physics simulation in Common Lisp, and explored the main features of the cl-fast-ecs framework. The full source code can be found at github.
At the time of writing, the version of the cl-fast-ecs framework is 0.4.0, which means that it is rapidly evolving and there still may be changes breaking backward compatibility. However, the functionality we’ve covered today — macros for defining components and systems, functions for creating entities — is fundamental and is unlikely to undergo major changes in the future.
In the next part, we will add user interaction and switch from the space genre to the fantasy genre as we attempt to make a simple dungeon crawler. Follow me on itch.io so you won’t miss the next part.
I would like to thank my friend @ViruScD for support and help in writing the article, and Artem from the Lisp Forever Telegram community for help with proofreading the text.
Comments
Log in with itch.io to leave a comment.
I've followed along using the raylib cookiecutter template.
In raylib I had to `texture-id` inside the `image` component, because `raylib::texture` would otherwise be wrapped.
Super Great guide and tools. Thanks for providing such quality resources to the Lisp community.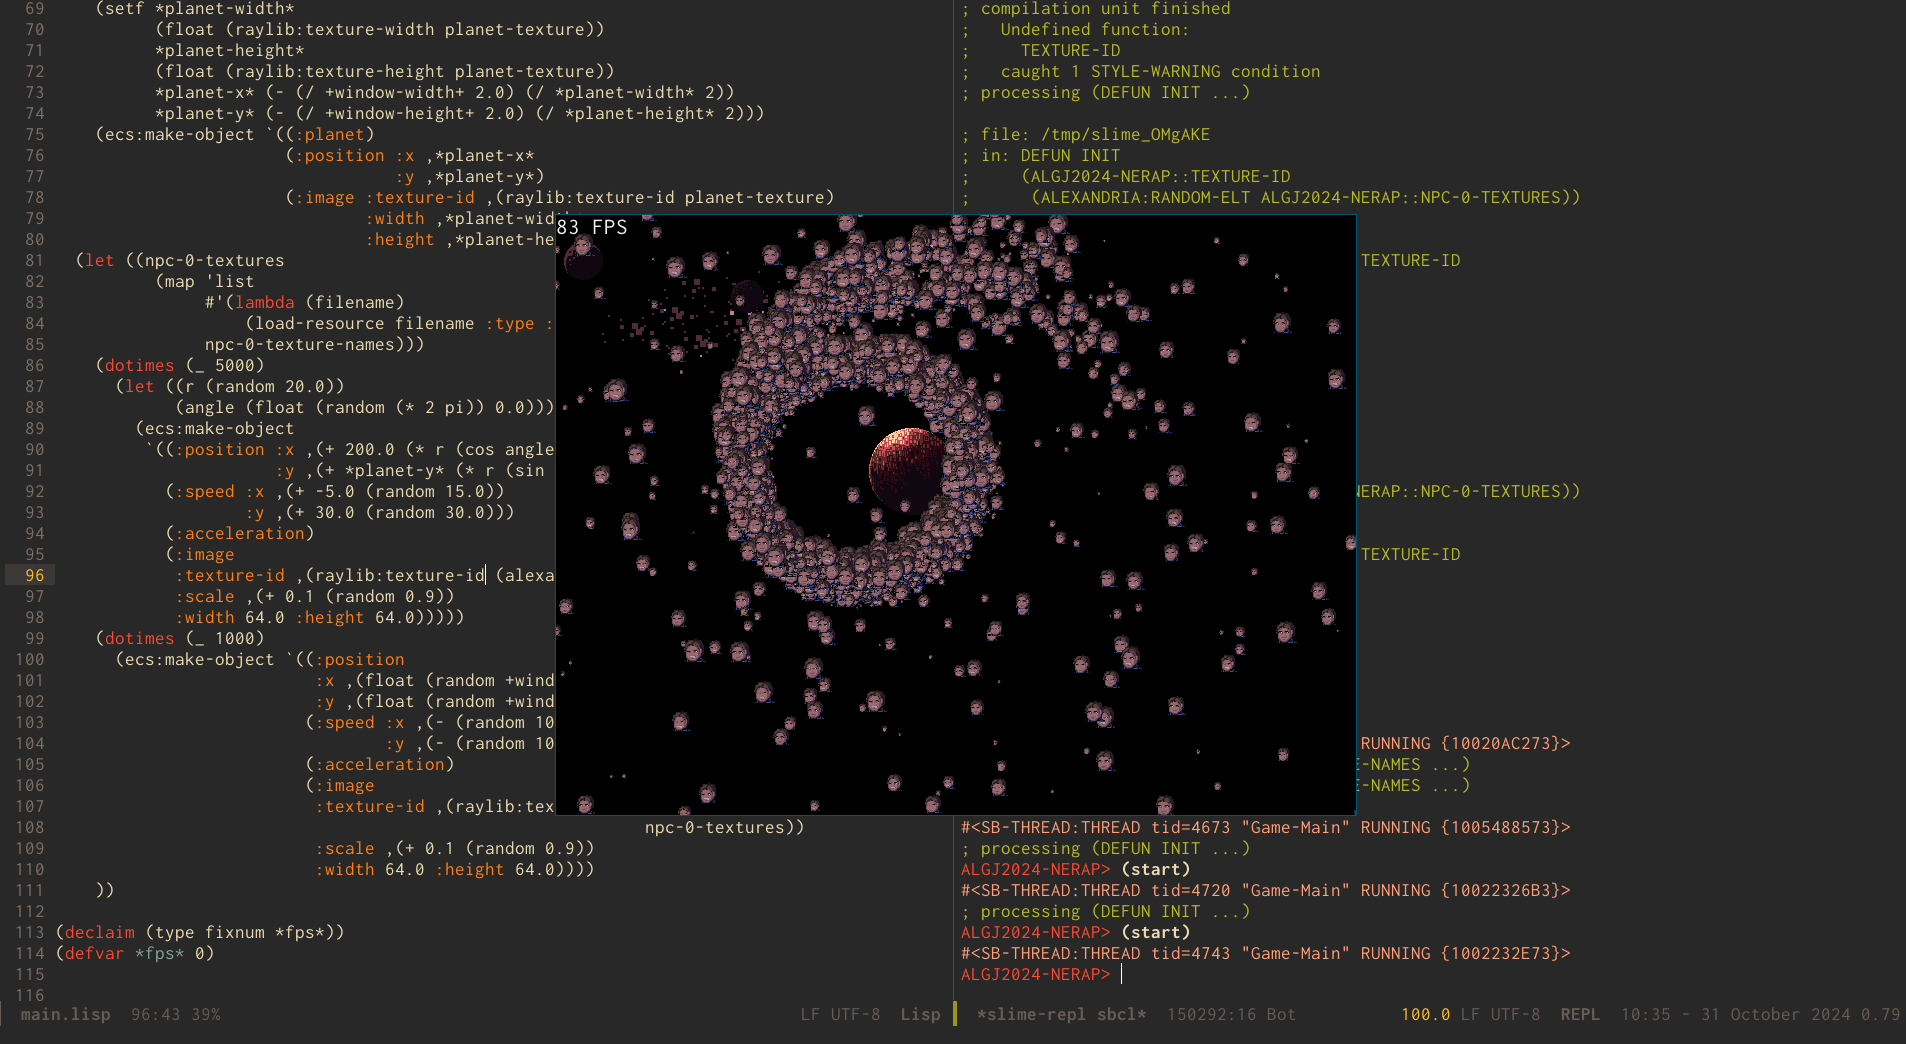
Thanks for trying it out with raylib! I’m glad you liked it 😊
[] if I understand, ecs:make-object expects per object an alist where the cars are keywords and cdrs are plists keyed by keywords.
So instead of using symbol-name, I would have a :name property in a plist to construct the input to ecs:make-object. And I guess I would need a :package property if I wanted to refer to the password; actually, is there symbol support or sequence support (I understand sequences of indeterminate length aren't nice for fast searches).
I'll actually try the example when I'm at home.
Not exactly, it expects a list of component specifiers, each specifier is a list with component name as its
carand a plist with component data as itscdr.You can certainly have a
namecomponent.Sequences indeed do not fit nice into ECS model, you might want an assortment of entities instead (as entities are in fact just indices in component arrays).
oh yeah I got it backwards. that name referred to the defined component name, I would have to put a symbol-name property inside the component if I wanted it. Now I got it working I can actually use it and see ;p. And I would call make-object once for every object, the object having components having component properties.
This was quite good. Thank you for taking the time. I to am anxiously waiting for the next part.
Thank you! I’m already halfway through writing it 😅
that was unbelievable. Thank you very much, we are waiting part2.
Thank you! I’m slowly working on it 😅